A thermal bridge ‘free’ design is one of the 5 fundamental principles of Passive House design and construction. But, what even is a thermal bridge? Why are they important? And how do we go about reducing or eliminating them? We hope to answer some of these questions and more with this post, which has been adapted from the 2016 iPHA Factsheet “What is a thermal bridge?“, originally authored by PHI’s Dr. Benjamin Krick. View more iPHA factsheets here on the Passipedia website.
Heat always wants to flow from hot areas to cold ones. In doing so, it follows the path of least resistance. A thermal bridge is a localised area of the building envelope where the heat flow is different (usually increased) in comparison with adjacent areas. In other words, these thermal bridges act as a heat highway headed straight to the outdoors. Due to this, the temperature of the interior surface near the thermal bridge is lower. If this spot becomes too cold, it could lead to condensation and moisture build-up. Over time, mould may even form, potentially damaging the building structure.
A better level of thermal protection generally leads to higher surface temperatures, including near thermal bridges, therefore highly energy efficient buildings are less problematic in this regard. In addition, Passive House standard requires a thermal bridge ‘free’ design. For the most accurate definition of thermal bridge ‘free’ design, be sure to read the Passipedia article “What defines thermal bridge free design?“. The general rule of thumb for Passive House buildings, however, is Ψ ⩽ 0.01 W/(mK).
Types of thermal bridges
In general, a distinction is made between linear and point thermal bridges. Linear thermal bridges include ceiling junctions, projecting balcony slabs, outer corners, verges and eaves.

Point thermal bridges are single penetrations in the thermal envelope of the building. Examples of these include mounting brackets for canopies, penetrations by electrical cables, sub-constructions for ventilated façades and insulation fasteners. Let’s look at one fo the most common examples of a thermal bridge: the projecting balcony slab.
Example: projecting balcony slab

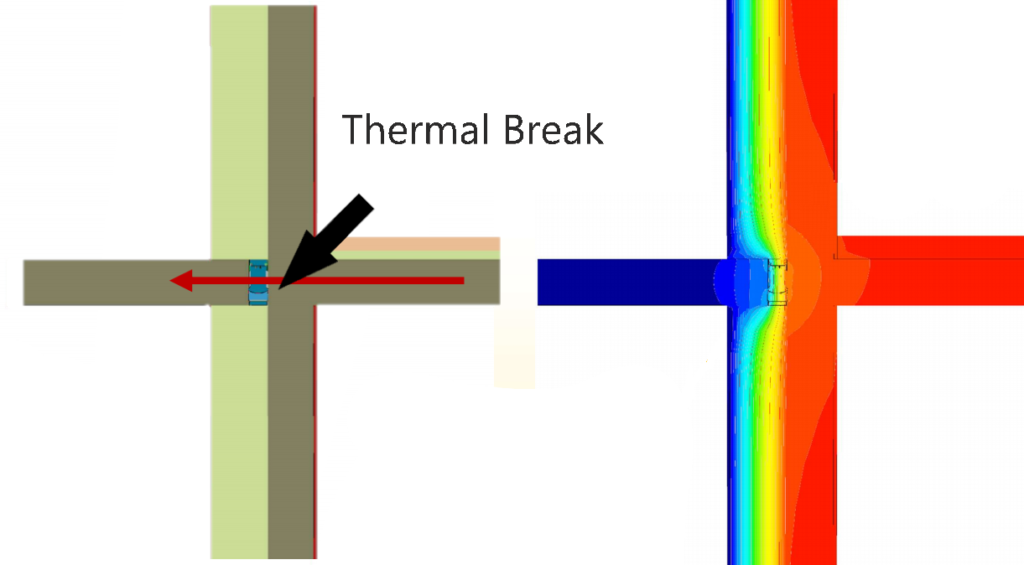
If the concrete slab continues through the insulation as a balcony, then the thermal building envelope will be completely penetrated by the heat-conducting concrete, resulting in a significant thermal bridge. In existing buildings, mould growth often occurs at this point. However, if the balcony is placed in front of the building instead, the insulation can continue uninterrupted and a thermal bridge will not occur. However, this is not always possible (e.g. with highrise buildings).
One way to handle this is to use a “thermal break”. Instead of the slab passing directly through the insulation, thermal breaks are used, which allow for cantilevers of a certain length, while also reducing the linear heat loss. Using certified Passive House components, these thermal breaks can reduce the thermal bridge by up to 75%, and the indoor temperatures remain unproblematic. More information and examples of Passive House suitable balcony connections can be found on the Passive House Component Database. Using this same example, let’s examine the 3 step process for calculating the linear thermal bridge coefficient.

Calculating the thermal bridge coefficient
Thermal bridges are determined in three steps:

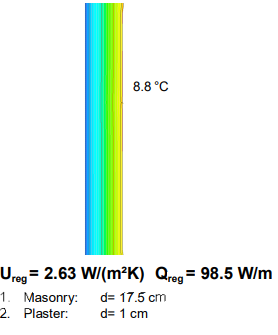
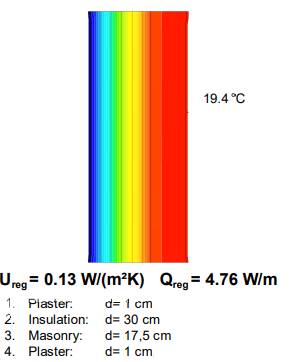
- Determine heat flow through the uninterrupted building component Qreg [W/m] with a height [h] using the PHPP or heat flow software:


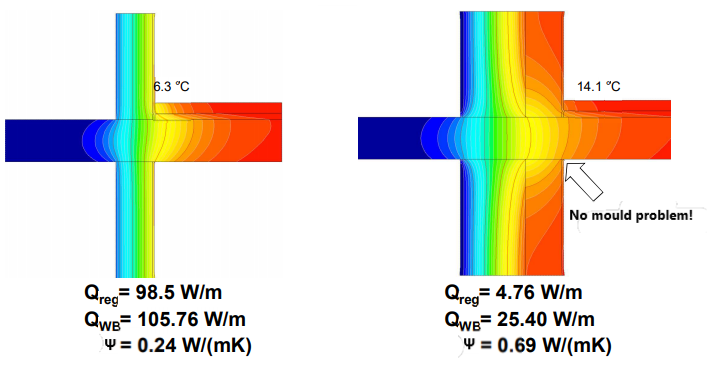
- Determine heat flow through the actual building component QWB [m] by means of a heat flow software. For this, the height of the building component and the temperature difference [Δθ] must be the same as in the first step.

- Calculate the thermal bridge coefficient Ψ [W/(mK)] according to the following formula:

Examining the results
One thing that can be confusing for those unfamiliar with working with thermal bridges is the effect of additional insulation on the value for the thermal bridge coefficient. One could look at the above calculation and think, “What on Earth. Why are thermal bridges worse in my insulated building?”. The thermal bridge for the uninsulated wall was 0.24 W/(mK), whereas the thermal bridge for the Passive House wall was nearly 3 times higher at 0.69 W/(mK). This is simply because of the way the thermal bridge coefficient is calculated. The linear heat loss coefficient is calculated relative to the undisturbed component and signifies the additional heat loss caused by a thermal disturbance. Relativity being the key concept here.
In the case of uninsulated walls, the heat loss is very high anyway, so the situation is hardly worsened by the projecting balcony slab. If the wall is insulated, however, energy loss through the uninterrupted wall will be lower. Thus, the balcony slab will then represent a significant deterioration.
So while it may appear as though thermal bridges are ‘worse’ with improved insulation, the total heat loss is considerably reduced by the insulation measure and the temperature of the interior surface is increased so much so that it is higher than the critical level of 12.6° C, as mould growth can occur below this level with normal indoor air humidity levels (50% RH).
Thanks for reading!
Interested in reading more like this? Check out the “Technical” category on our blog where you will find more articles like this include our most recent Technical piece “Ug, Uf, Uw, Uwhat? : An intro to the U-value and those most important to Passive House design“. Also be sure to explore more of the iPHA factsheets available on Passipedia – the Passive House Resource. Want to learn more about thermal bridges? Check out the suggested links in the Further Reading section below!
Further Reading
Basic principle for calculating thermal bridges on Passipedia


 Carl supports our international communication activities and is the point of contact for administrative enquiries.